Friday, October 8, 2010
Note
When looking at comments, I saw that some people seem to think "drum mixing" only pertains to samples drums. You have to mix live drums too... you have to mix everything that goes into a song. You don't just record a song and then it's done. There's a fuck ton of work that goes into a song after it's recorded
Arrrrg!
Holy crap, sorry I've been MIA for a while. I've been looking for internships and been doing some freelance work. I'll hit all you guys up and check out the updates on your blogs, then I'll make a post tonight. I have absolutely no ideas, but if I post videos, I'll do it through youtube, because Blogger kills the sound quality when I upload videos through them.
Friday, October 1, 2010
Drum Mixing
Sorry it's been taking me so long to make posts lately. I thought I'd have more time to do stuff once school was over with, but I haven't had time to do anything. It's weird... I originally went to school for audio engineering because I wanted to be able to make my own music sound better, but I don't even remember the last time I've had time to finish any songs of my own. Sucks.
So drum mixing is pretty cool. Sorry, there won't be any audio examples on this post. There's no point really. You can find an example of good sounding drums on any album that you like. You can find an example of bad sounding drums on the Myspace page of any shitty band that thinks they can make their album by themselves (not to say that a band can't do that, but 97% of them probably shouldn't...).
There are so many ways to do this... I mean, drums are always mixed differently. It really depends on how they sound with the rest of the song. So I'm just gonna give a few general little things you can do to make the drums sound pretty clear. There's no way to tell you how to do a complete drum mix. You just have to listen to the drums with the rest of the song and decide what needs to be done.
First, I'll talk about each specific drum.
Kicks: The first you're probably going to do is EQ. When EQ'ing, some good things to focus on are the attack and the tone of the kick. You'll find the attack somewhere up around 4K. Just sweep around until you hear a very solid sounding thwack. For the tone, look somewhere around 100 Hz. You'll know when you find it, because instead of hearing some low rumbly shit, you'll hear a clear, defined tone.
Subkick: I usually don't ever touch the subkick unless it sounds like something is wrong with it. It's just adding low-end to the kick, so as long as it's doing that, then I see no reason to mess with it.
Snare: The snare will be similar to the kick. You'll find the attack up high around 6K-ish. As for the tone, you probably won't need to find that unless you're going to cut it. Most snares actually have too much tone. To find that, just sweep around the high mids until you find that horrible ringing sound, then pull that out. Another thing to look for is muddiness. Anything from 600 to 800 can be muddy. Just gently dip some of that stuff out and sweep around in there until the snare sounds clear. Finally, if the snare sound like it has no balls, try boosting a little around 500.
Bottom snare: The only thing I usually do to the bottom snare is add some brightness with a high-shelf. I just bring it in a little higher than where I found the attack of the snare, so usually around 8K. I just pull it up until it sounds bright enough in the song. It shouldn't take much.
Toms: Toms are easy, especially if you know how they are tuned. The first thing to look for is, of course, the attack. After that, you can find the tone of the tom down around 100-200 Hz. You can either sweep around until it sticks out at you, or if you know the pitch of the tom, you can look at a chart of equal temperament, find the note, see the corresponding frequency, and then boost that.
Cymbals: I would do all of these separately, but there's not much point. For hats, you'll just wanna find a high frequency to boost to bring out a ringing sound, and you may wanna find a mid-range frequency to pull out if there's too much mud. Same for the ride. For the crashes and such, you'll be working with the overheads, so you can just use a high-shelf and raise it until the cymbals are clear, but not hissing so much that it hurts. That's tricky though, because the overheads are used to accentuate the rest of the kit too... so it really all depends on what you want. For the hat and ride, you can use a low shelf or a high pass to get ride of everything below 100 Hz.
Compression
Compression is awesome because it can take a pretty flat sounding drum and make it pop. I use compression onthe kick, the subkick, snare top, bottom, toms, hi hat, ri fuckin everything. Ok, that's a lie. I don't use it on overheads or room mics. You could use it on the overheads if you wanted. My only problem is that it takes the whole kit and makes everything pretty much the same volume, when I need the overheads to have a lot of focus on the cymbals. It probably would make the kit sound really solid, but I never even try it... so now I'll have to try it next time I have a chance. And I don't use it on the room mics because it'd make the whole room sound like it was pulsing, but that could be cool, so I'll have to try that too.
It's pretty simple. For individual drums, just leave the attack slow enough that it lets the initial hit of the drum through... probably around 11ms or something. You could make it a lot longer. I've done it with the attack almost all the way up, but 99% of the time you won't wanna do that. So after that, just set the release according to how the drum is being play. If it's a snare and it's being hit over and over really quick, you'll wanna make the release faster. If the snare isn't being hit too often, just let the release be long enough to accomodate the ringing of the snare. For the threshold and the ratio, you gotta play around and see what you like. I usually just go crazy with it.
I did a whole post on compression. Click Here to see it. It goes into more detail about how to set up a compressor and get it how you want it without pulling your hair out. If you're new to compression, it can be confusing trying to set all the parameters. Compression is something that can really only be heard if it's overdone.... It makes a huge difference when done correctly, but you can't.... hear... it <_<... You'd really have to play with a compressor for a while to understand. But so what I was saying - Compression is something that can really only be heard if it's overdone, so if you're just starting out, it's hard to set a compressor and know you've set it right. And easy way to start is by pulling the threshold all the way down, the ratio all the way up, the attack all the way down, and the release at like .1 or something. Then you can set your attack and release and easily hear how they are making the compressor respond. After that, you can adjust the threshold and ratio to your liking. Then of course, set your make up gain so that it negates any reduction - i.e. the signal should be at the same volume when the compressor is engaged or bypassed. There's autogain, which done is for you, but sometimes it's totally wrong. There's also auto-release. It works pretty good most of the time, but you should at least try to set the release on your own.
Compressions is pretty badass on a G series SSL. You can *cough* buy a plug-in from Waves that emulates an SSL channel strip. They have one for the G series. It has autogain. There's no other option. The attack only has two settings - fast and slow. That sounds like a bad thing, but it's never bothered me. It always works awesomely. I just alway leave the attack slow, the release as fast as it will go, and then the threshold and ratio usually end up around 1 o'clock. It's always different, but yeah, they're usually somewhere around 1 o'clock.
Last thing - trash mics. I've said this several times before, and it's in the Compression post, as well as one of the posts about making a kit... I forget which one. But anyways, when you use a trash mic, just make the ratio as high as possible, the threshold as low as possible, the release as slow as possible, and the attack as slow as possible. There's a link to a plug-in for trash mics in a couple of my posts. You can find it in the Compression one.
So drum mixing is pretty cool. Sorry, there won't be any audio examples on this post. There's no point really. You can find an example of good sounding drums on any album that you like. You can find an example of bad sounding drums on the Myspace page of any shitty band that thinks they can make their album by themselves (not to say that a band can't do that, but 97% of them probably shouldn't...).
There are so many ways to do this... I mean, drums are always mixed differently. It really depends on how they sound with the rest of the song. So I'm just gonna give a few general little things you can do to make the drums sound pretty clear. There's no way to tell you how to do a complete drum mix. You just have to listen to the drums with the rest of the song and decide what needs to be done.
First, I'll talk about each specific drum.
Kicks: The first you're probably going to do is EQ. When EQ'ing, some good things to focus on are the attack and the tone of the kick. You'll find the attack somewhere up around 4K. Just sweep around until you hear a very solid sounding thwack. For the tone, look somewhere around 100 Hz. You'll know when you find it, because instead of hearing some low rumbly shit, you'll hear a clear, defined tone.
Subkick: I usually don't ever touch the subkick unless it sounds like something is wrong with it. It's just adding low-end to the kick, so as long as it's doing that, then I see no reason to mess with it.
Snare: The snare will be similar to the kick. You'll find the attack up high around 6K-ish. As for the tone, you probably won't need to find that unless you're going to cut it. Most snares actually have too much tone. To find that, just sweep around the high mids until you find that horrible ringing sound, then pull that out. Another thing to look for is muddiness. Anything from 600 to 800 can be muddy. Just gently dip some of that stuff out and sweep around in there until the snare sounds clear. Finally, if the snare sound like it has no balls, try boosting a little around 500.
Bottom snare: The only thing I usually do to the bottom snare is add some brightness with a high-shelf. I just bring it in a little higher than where I found the attack of the snare, so usually around 8K. I just pull it up until it sounds bright enough in the song. It shouldn't take much.
Toms: Toms are easy, especially if you know how they are tuned. The first thing to look for is, of course, the attack. After that, you can find the tone of the tom down around 100-200 Hz. You can either sweep around until it sticks out at you, or if you know the pitch of the tom, you can look at a chart of equal temperament, find the note, see the corresponding frequency, and then boost that.
Cymbals: I would do all of these separately, but there's not much point. For hats, you'll just wanna find a high frequency to boost to bring out a ringing sound, and you may wanna find a mid-range frequency to pull out if there's too much mud. Same for the ride. For the crashes and such, you'll be working with the overheads, so you can just use a high-shelf and raise it until the cymbals are clear, but not hissing so much that it hurts. That's tricky though, because the overheads are used to accentuate the rest of the kit too... so it really all depends on what you want. For the hat and ride, you can use a low shelf or a high pass to get ride of everything below 100 Hz.
Compression
Compression is awesome because it can take a pretty flat sounding drum and make it pop. I use compression on
It's pretty simple. For individual drums, just leave the attack slow enough that it lets the initial hit of the drum through... probably around 11ms or something. You could make it a lot longer. I've done it with the attack almost all the way up, but 99% of the time you won't wanna do that. So after that, just set the release according to how the drum is being play. If it's a snare and it's being hit over and over really quick, you'll wanna make the release faster. If the snare isn't being hit too often, just let the release be long enough to accomodate the ringing of the snare. For the threshold and the ratio, you gotta play around and see what you like. I usually just go crazy with it.
I did a whole post on compression. Click Here to see it. It goes into more detail about how to set up a compressor and get it how you want it without pulling your hair out. If you're new to compression, it can be confusing trying to set all the parameters. Compression is something that can really only be heard if it's overdone.... It makes a huge difference when done correctly, but you can't.... hear... it <_<... You'd really have to play with a compressor for a while to understand. But so what I was saying - Compression is something that can really only be heard if it's overdone, so if you're just starting out, it's hard to set a compressor and know you've set it right. And easy way to start is by pulling the threshold all the way down, the ratio all the way up, the attack all the way down, and the release at like .1 or something. Then you can set your attack and release and easily hear how they are making the compressor respond. After that, you can adjust the threshold and ratio to your liking. Then of course, set your make up gain so that it negates any reduction - i.e. the signal should be at the same volume when the compressor is engaged or bypassed. There's autogain, which done is for you, but sometimes it's totally wrong. There's also auto-release. It works pretty good most of the time, but you should at least try to set the release on your own.
Compressions is pretty badass on a G series SSL. You can *cough* buy a plug-in from Waves that emulates an SSL channel strip. They have one for the G series. It has autogain. There's no other option. The attack only has two settings - fast and slow. That sounds like a bad thing, but it's never bothered me. It always works awesomely. I just alway leave the attack slow, the release as fast as it will go, and then the threshold and ratio usually end up around 1 o'clock. It's always different, but yeah, they're usually somewhere around 1 o'clock.
Last thing - trash mics. I've said this several times before, and it's in the Compression post, as well as one of the posts about making a kit... I forget which one. But anyways, when you use a trash mic, just make the ratio as high as possible, the threshold as low as possible, the release as slow as possible, and the attack as slow as possible. There's a link to a plug-in for trash mics in a couple of my posts. You can find it in the Compression one.
Monday, September 27, 2010
Making a Kit - Pt. 5: Finishing It
Ok, so like I said in my last post, I finished the kit.
Here's the link - http://www.megaupload.com/?d=3R910PSN
(if you download it, there are some useful notes at the bottom of the post)

I made more videos this time explaining it, but I still wanted to write a little.
So in Part 4, I messed with Logic and made a fake trash mic. After that, I had to pull all the samples into Reason. I already had a template made, so I could just bring in the samples and not have to worry about too much routing.
 Pulled them into the NN-XT's. There was one
NN-XT for each drum. Each NN-XT contained samples from 14 mics, with clips of the drum being hit at different velocities.
 I had to sort them by velocity and set up the velocities so that it sounded like the drums got naturally louder when the keys are pressed harder.
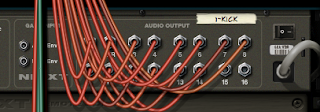 So after that, I assigned each sample to an output according to which mic it was recorded with. There are several samples going to the same outputs, but each output only receives signal from one mic.


 From there, everything goes to some "preamps". Not really preamps... just mixers that come before another mixer (whether it be in Reason or in another DAW). It's still useful to have them though. They probably wouldn't be useful very often, but it's good to have them incase your signal is too hot (although if it's clipping before the preamps, it should be attenuated before the preamps).
 That's pretty much it. Each preamp then goes to the I/O, but that's the end of it.
Here's the link - http://www.megaupload.com/?d=3R910PSN
(if you download it, there are some useful notes at the bottom of the post)

I made more videos this time explaining it, but I still wanted to write a little.
So in Part 4, I messed with Logic and made a fake trash mic. After that, I had to pull all the samples into Reason. I already had a template made, so I could just bring in the samples and not have to worry about too much routing.

NN-XT for each drum. Each NN-XT contained samples from 14 mics, with clips of the drum being hit at different velocities.
I had to sort them by velocity and set up the velocities so that it sounded like the drums got naturally louder when the keys are pressed harder. So after that, I assigned each sample to an output according to which mic it was recorded with. There are several samples going to the same outputs, but each output only receives signal from one mic.
I used a total of 14 outputs on each NN-XT. Each output was then routed to a mixer which represented it's corresponding microphone. Each mixer had 11 channels of audio (2 of them being stereo). So, for instance, the mixer that represents the mic that was used to record the inner kick (D 112) receives all the signals from each NN-XT that was recorded with the D 112, regardless of which drum it is.
So from there, on each mixer, I had to take everything other than primary drum that was being recorded with that mic, and I had to send it out aux 4 (pre) and subgroup it all into one channel. This made it easier to add some controls to the combinators (you'll see).

Then I used aux 1 to send everything to some effects. It's all going to some distortion units. I know that shouldn't be done with a parallel connection, but this distortion really fucks up the drums, and it sounded better to have some dry signal mixed in as well.
I also took the main output of each mixer and ran it through some distortion to simulate tubes and tape. For all these effects, each mixer had to have it's own FX unit. Otherwise, everything would have needed to be grouped to a stereo mix to go through the tape units, and it would have only come back in one stereo mix for the other distortion units.
 From there, everything goes to some "preamps". Not really preamps... just mixers that come before another mixer (whether it be in Reason or in another DAW). It's still useful to have them though. They probably wouldn't be useful very often, but it's good to have them incase your signal is too hot (although if it's clipping before the preamps, it should be attenuated before the preamps).
 I also had to do some shit within the combinators to make the knobs and button in it control shit on the devices within each combinator... but I won't even talk about that.
---------------------------------------------------------------------------------------------------
VIDEOS
Note: In these videos, I keep hearing pops. I wasn't hearing that during the recording, so I think it was just the screen capture software freaking out.
Also, the drums don't have that clicky sound in them. Every time I play a drum, you hear a click, but that's coming from my keyboard.
And finally, excuse the shitty audio quality. They sound good on my computer, but once uploaded, the quality is horribly reduced.
As I've said in previous posts, this kit in umixed. No EQ, compression, or anything. It's up to the user to make it sound good. I wanted it to be like going into a tracking session and having the kit mic'd and have level set done, but no mixing at all. Thay way, I can start with a clean slate when I go to mix.
Here's a short video with a before and after example.
The "before" is what the drums would sound like during tracking
The "after" is what it sounded like once I did a quick mix.
This drum pattern is cheesey, but it has every single drum being played, so it's good for demonstration I guess.
I spend about 30 minutes doing this mix (with headphones), and I think it turned out good. It's definitely way better than what it sounded like at first. So if you download the kit and don't like the way it sounds, then you'll definitely need to do a little mixing.
This one shows a little about how the kit works and how it's layed out.
Here's another video which is pretty much just me elaborating on the first half of this post
Note: When I say the shit about the tracks being grouped to a stereo mix if I'd only used on distortion unit, I meant on the output of that. You'd still have separate channels for each drum, but the FX output would be a stereo mix.
And finally, this one just explains the few problems the kit has.
---------------------------------------------------------------------------------------------------
For anyone who downloads the kit (all two of you), here are some things you'll need to know.
Once downloaded, you'll have an rfl file (refill). It's got a red icon. You'll pull this into your Reason folder. You'll see a couple of other rfl files in there too.
To open the kit, go into Reason and go to Open. Then nagivate to your Reason folder and find the Mantooth Drum Kit refill, then inside that you'll see a folder called "Sessions". Just one one of those 3 sessions.
There are 3 sessions:
Mantooth Drum Kit - use this one when Rewiring Reason to a DAW
Standalone Version - use this if you're just running Reason
Standalone Lite - easier to use, but less control
When you Rewire this to a DAW, you'll need 3 external MIDI channels. One for kick & snare, one for toms, and one for cymbals. Make sure all 3 are armed for record.
When running the standalone, make sure you highlight the track for the combinator you want to play (kick & snare, toms, cymbals). You can only play one combinator at a time. It's not a big deal if you're just writing in MIDI with the pencil tool, but if you're using a keyboard, you may want to use the Standalone Lite version.
Here's the key layout (starts on C3). Obviously, the colors indicate which things are like... related somehow

If you do happen to download the kit and you have any questions, just leave a comment or watch the videos above.
My next post will be bout drum mixing, so if you have a hard time making these sound good, I'll help you out.
Fuckin Finally
Alright, here it is
http://www.megaupload.com/?d=3R910PSN
Just drag the refill (.rfl) into your Reason folder.
In Reason, go to Open and select the Mantooth Drum Kit refill. Inside you'll see a folder called "Sessions"
Select one of the three
-Mantooth Drum Kit: for use with Rewire
-Standalone: for use in Reason alone
-Standalone Lite: easier to use and program with, but less options
Like I said before, it's not mixed. It sound exactly like you mic'd up a drum kit and have done absolutely nothing to it. You can mix it however you like. I'll be doing a post about drum mixing tomorrow.
You can open up each combinator (Mixers, Kick & Snare, Toms, etc) and see the contents by clicking "Show Devices" on each combinator, but none of that stuff has to be messed with.
I'll post more shit about this later. I'm gonna do the last part of Making a Drum Kit, so I'll explain how it's all laid out and how it works
ps - If for any reason you get a message saying that files cannot be found (shouldn't happen though), click "Locate" and "Search Folder" (or something like that...) and select the Mantooth Drum Kit refill. It should automatically find them
Sunday, September 26, 2010
Almost
EDIT: Sorry, doesn't work in Reason 4. Only 5. I went back and tested it on another computer with 4 and it wouldn't open. Sorry :( You can always get the demo of 5, or... ya know. It's easy to find
EDIT 2: So it'll be later today (Monday). Like a moron, I left all the audio files without appendages, so it won't work on PC until I manually go through and add ".wav" to all 1,770 audio files. It's 6am, so I'm gonna have to get sleep before I do it.
I'm putting the finishing touches on the drum kit. I'll have it available for download sometime tonight.Give it about two or three hours, and I'll have it up... unless something goes horribly wrong.
It'll work in Reason 4 and 5. The one I'm uploading tonight is meant to run in Reason, then Rewired to pretty much any DAW. You can Rewire it to Logic, Pro Tools, Ableton, Cubase, Fruity Loops, and probably a handful of other DAWs.
I'll also be posting a stand-alone version so you can run it in Reason without having to have a DAW. This would be great if you already do a bunch of work in Reason. Just know that mixing it inside of Reason is going to suck ass. If you accidentally fuck up the routing, it might be hard to figure out how to fix it.
EDIT 2: So it'll be later today (Monday). Like a moron, I left all the audio files without appendages, so it won't work on PC until I manually go through and add ".wav" to all 1,770 audio files. It's 6am, so I'm gonna have to get sleep before I do it.
I'm putting the finishing touches on the drum kit. I'll have it available for download sometime tonight.
I'll also be posting a stand-alone version so you can run it in Reason without having to have a DAW. This would be great if you already do a bunch of work in Reason. Just know that mixing it inside of Reason is going to suck ass. If you accidentally fuck up the routing, it might be hard to figure out how to fix it.
Friday, September 24, 2010
Success
Fuck yeah! I pretty much finished the kit. I went to the doctor this morning and got a shot and some medicine for my ear, and it's already feeling a little better, so I decided to do a little work.
All I have to do is set up the effects, patch them in, and set up all the knobs and buttons to control certain parameters.
I'll make a longer post showing the process of loading in samples and all the shit I had to do, but I gotta teach my first class in the morning, so I'm going to bed in just a minute.
I'll have the kit available for download by Sunday or Monday. I'll also put up a few samples and demonstration videos. Like I've said before, this kit simulates a mic'd, yet unmixed kit, so the post after my final "Making a Kit" post will be about mixing drums. I've covered drum mixing a little in previous posts, so I'll try not to repeat too much of the same info.
Wednesday, September 22, 2010
Ow
Yay! I have an ear infection! At least I hope it's an ear infection. If not, then something pretty gnarly is going on inside there.
So yeah, I haven't done any work on the kit today or most of last night. Shit hurts, man. But I did take my last final exam today. I don't know the exact score yet, but I was told it looked like a mid-to-high A. I scored 100% on my theory final. I don't know what my grade is for my Pro Tools final, but I know I did good. I'll have to call in a week to get grades for my Pro Tools and SSL finals. So fuck yeah! All I have left to do is an exit interview.
I'll have that drum shit finished this weekend. I won't be working on it tomorrow for sure because of my ear. I have a doctor's appointment Friday, but hopefully it'll be feeling a little better by then. I gotta teach my first class on Saturday, so I'll come home and finish the drums Saturday night and Sunday morning.
I did, however, make some snazzy skins for the kit. I figured I might as well do something productive even if I can't listen to stuff. This is sort of what it'll look like when it's all collapsed and everything is hidden, except the labels will be different... something other than "Button 1" and "Rotary 3"... and everything will be labeled different on the cymbals. That's just a preset I loaded to test the skin with. I'll end up putting tuner knobs for individual toms, the kick and snare, a knob to tighten the heads, to choke the cymbals, and a bunch of shat like that.

So I did decide I'm gonna add effects. Not much though. Just some tape and tube emulation, and 1 really nasty sounding distortion chain. Not doing any time-based effects.
Monday, September 20, 2010
Making a Kit - Pt. 4: The Sequel to Part 3
So, after getting my Reason session all nice and ready to go, I moved into Logic. I decided that I was gonna totally bullshit something and see if it worked out. Here's the story.


 So everything was set up. All that was left for me to do was pull in the samples from the spot mic from each drum, at each velocity, and bounce them one at a time. In total I had to do 63 samples.
See, when I recorded these drum samples, it was at the end of a session. Me and my cousin had been tracking drums for one of our songs. Well, during the setup for that session, I ran into a bunch of problems. A bunch of mic stands all around the school were broken (because assholes try to tighten them way too much), so I had to keep running around and swapping out mics stands. Also, one of the dude's from my class kept barging in the studio and whining about some bullshit (basically, that he was having to work his ass of just to slip by since he slacked off like a dumbass for the previous few months).
So I ended up being set back by about half an hour. We really had to rush, because we were recording a 13 minute song and I had no idea how long it would take to gets some good takes out of my cousin. So, after all the mics were set up, I was doing level check, and I noticed that the trash mic wasn't putting out signal. I ran out to the live room and made sure it plugged in good. It was, so it had to be a bad cable. Well, my cousin was already pissed off a little and so was I, we didn't have much time, and I kinda just didn't give a fuck, so I just let it slide (only because it was a personal project).
Anyways, the point is that I didn't have a trash mic. A trash mic is pretty much just a mic that goes behind the drummer and gets compressed to hell and back. There's a more lengthy explanation of it my Compression post (very bottom).
Well after everything was recorded, I decided that I really wanted that trash mic. Especially once I started putting together this kit. Now that I'm out of school, I won't have access to their awesome mics anymore. I also won't have access to that specific drum kit, or more importantly, that live room... or that SSL... not until I go back for my final semester of music business classes next year.
So I wanted this kit to really be a straight up replica of the same exact signals I got from that kit, recorded with those mics, running through that console. Well, I really like using a trash mic, and I didn't have one. So the only solution was to fake one.
In order to do this, I had to somehow use signals from all those different mics and make them sound like one microphone behind the drum kit, about 7 feet high. So I'm having to fuck with time of arrival and also make some really nice condensor mics (which were only used for overheads, hat, and ride) sound like a fucking SM58.

Ok, so here's what I did. I just took the signal from the spot mics of each drum and made a virtual replica of the kit using Logic's binaural panner. I had to do it from the perspective of that SM58. It was up high facing directly between the high an mid toms. So I had to pan everything out left and right accordingly. Once that was done, I had to set their vertical positions. So obviously the kick was down low, the snare was sorta low, the cymbals were high, blah blah. Then I had to make it seem like the mic was a few feet behind the kit. So I figure that distance from the mic stand to the front of the kick drum was about 5 feet or so (which just happens to about 1.5 meters, Logic's default room radius). So, considering this mic would actually be picking up the back of the kick, I didn't put it all the way to the edge of the "room".
This picture shows all my fake drum positions. The center is where the trash mic would be. I don't know why that china cymbal is back so far... I don't remember doing that, so I'm assuming I accidentally moved it when I was taking the screenshots of this shit.
So all that shit is set up. Then I had to route all those signals to an aux with the binaural post processing, and then send that to another aux that converted the signal to mono. Since I'm just trying to create signal for one mic, I need a mono signal, but I had to convert it to mono after the binaural aux. This way, the binaural aux would still be a stereo channel and be able to recreate a fake room with the binaural panner. I needed the stereo signal to create the 3D space, then the mono aux signal is technically what represents the trash mic.

I also added some gates to the channels which had signal from condensor mics. The threshold was all the low and the release was long. I just needed a couple of milliseconds of attack to take those condensors and give the slower response of a dynamic mic. I also slapped on an EQ to take out a tiny bit of high end. I honestly didn't EQ as much as I should have, but none of this shit was perfect anyways. It was all experimental and obviously gonna be flawed, so I figured I'd just barely effect the beautiful signal of those condensors and leave them sounding the way I liked them instead of fucking them up.
 So everything was set up. All that was left for me to do was pull in the samples from the spot mic from each drum, at each velocity, and bounce them one at a time. In total I had to do 63 samples.
 So yeah, it was a pain in the ass, and no, this can't replace the real thing, but I did get a pretty accurate time of arrival for each drum, and I did get a pretty decent simulated trash mic. But in the end, it doesn't matter if it's a little fucked up. It's just gonna get the shit compressed out of it and be put really low into the mix, so whatever. It's better than nothing, and I think it sounds pretty damn accurate.
The next post will have some audio examples of the kit. There are probably only two more parts to this series of posts, then I'll finally be doing talking about something else.
Saturday, September 18, 2010
Making a Kit - Pt. 3: Making your Head Asplode
Before I begin, I'm gonna list a few terms. If anyone actually reads this and doesn't know too much about Reason or microphones, I'd like it to make a little bit of sense.
I chose to use Reason to house the kit. Normally, I would have used Logic's ESX24, but since this was going to be a super complex kit, I chose Reason. Another reason I chose Reason... <_< .... was so I could use so I could use it on my Mac or my PC. And the main benefit is that it can be Rewired to Pro Tools, Logic, Ableton, Cubase, Audition, Fruity Loops, or whatever the fuck else uses Rewire!
I set it up so that Reason would just be the host for the kit, without doing any kind of mixing and without any effects. The main purpose of this kit was to give me a realistic drum mixing experience for times when I don't have access to a real kit or a drummer. I like being able to make a thousand decisions and really mold the kit. Don't get me wrong, I'm a huge fan of Battery and I love a lot of the kits that come with Reason and Logic, but whenever I use those, it's when I want the drums to sound a little fake. A little too perfect to be real.
So I haven't loaded any of the samples into Reason, but I went ahead and made my template for the kit and routed everything out. I'm using NN-XTs to play the samples. There are 11 NN-XTs. Each one is used for a different drum (kick, snare, hat, ride, etc). So the Kick NN-XT has 9 kick hits, each at a different velocity, and each with samples of the signals from 14 microphones.
There are also 12 mixers. Each NN-XT represents a drum, whereas each mixer represents a microphone. Two of them are being used in stereo (one for overheads and one for room mics), so they represent two mics each. So in total, there were 14 microphones. So for example, the snare drum is mic'd with an SM57. When the drummer hits the snare, the SM57 obviously picks up the snare. But when the drummer hits a tom, the SM57 also picks up that.
For this reason, there is a mixer that specifically represents that SM57 microphone. So it will receive all the snare drum samples recorded from the SM57, but it will also receive the samples of every other drum recorded with the SM57, even though it wasn't the primary microphone for those other drums.
The same goes for the kick drum mic, an AKG D 112. The mixer that represents this mic will receive all the kick drum samples recorded with the D 112, but it will also receive all the other samples of all the other drums that were recorded with the D 112.
So the kick drum's NN-XT, for example, will route out to 12 mixers (14 mics). Each of those mixers, also receiving signal from other NN-XT's, will feed into another DAW, such as Logic, onto their own individual channel strips.
There are also 4 additional 6-channel mixers. They are being used to act as spot mics for 3 cymbals and sticks. None of these cymbals actually had separate spot mics. I'm just using the signal from the closest mic to act as a spot mic. I don't use spot mics on cymbals because the overheads pretty much are spot mics, they just happen to also make the rest of the kit sound brighter.
Take the crash cymbal, for example. The closest mic to it was the left overhead mic. So when the crash cymbal is routed to the Overhead Mics mixer, the signal from the left overhead is split into two signals, A and B. A goes to the Overhead Mics mixer's left channel input, like normal, while B goes to a separate mixer. This mixer is getting the same signal, but it gives me the ability to turn up the crash cymbal as it was recorded with the left overhead mic without turning up all the other drums as they were recorded with left overhead mic, and without turning up the crash cymbal as it was recorded from all the other mics.
That's something that I can't really do when I'm recording a live drummer, but since I have the option to do it now, I'm fucking doing it! I don't actually have to use separate mixers for those spot mics and the cymbals. The B signal could just be routed straight out to Logic, but I like the idea of them having a "home". I wanna be able to look at Reason and see those microphones being represented instead of lost in all the shit.
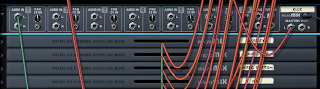
ANYWAY, here's a screenshot of the routing I did. That large mixer on top and the small mixer below it won't actually be used. I'm just using them right now while I build the kit so I won't have to have Logic open for the building process. I'll also save a copy of the session with those mixers included. That way I can use it while I'm running Reason in standalone mode (which I never do, though).
So yeah, no effects or mixing, just a source for the drums and a bunch of routing.
My next post will be about how I fake a trash mic with the binaural panner (surprise surprise) in Logic. I hope this was somewhat interesting.
Spot mic: A microphone placed very close to the source. With drums, a spot mic is the
primary mic for the drum it is closest to.
NN-XT: A software sampler within Reason.
Sampler: ....used to play samples of shit
Rewire: Some bullshit that magically allows Reason to route its signal to other DAWs
DAW: Digital audio workstation
I think that will suffice.
I chose to use Reason to house the kit. Normally, I would have used Logic's ESX24, but since this was going to be a super complex kit, I chose Reason. Another reason I chose Reason... <_< .... was so I could use so I could use it on my Mac or my PC. And the main benefit is that it can be Rewired to Pro Tools, Logic, Ableton, Cubase, Audition, Fruity Loops, or whatever the fuck else uses Rewire!
I set it up so that Reason would just be the host for the kit, without doing any kind of mixing and without any effects. The main purpose of this kit was to give me a realistic drum mixing experience for times when I don't have access to a real kit or a drummer. I like being able to make a thousand decisions and really mold the kit. Don't get me wrong, I'm a huge fan of Battery and I love a lot of the kits that come with Reason and Logic, but whenever I use those, it's when I want the drums to sound a little fake. A little too perfect to be real.
So I haven't loaded any of the samples into Reason, but I went ahead and made my template for the kit and routed everything out. I'm using NN-XTs to play the samples. There are 11 NN-XTs. Each one is used for a different drum (kick, snare, hat, ride, etc). So the Kick NN-XT has 9 kick hits, each at a different velocity, and each with samples of the signals from 14 microphones.
There are also 12 mixers. Each NN-XT represents a drum, whereas each mixer represents a microphone. Two of them are being used in stereo (one for overheads and one for room mics), so they represent two mics each. So in total, there were 14 microphones. So for example, the snare drum is mic'd with an SM57. When the drummer hits the snare, the SM57 obviously picks up the snare. But when the drummer hits a tom, the SM57 also picks up that.
For this reason, there is a mixer that specifically represents that SM57 microphone. So it will receive all the snare drum samples recorded from the SM57, but it will also receive the samples of every other drum recorded with the SM57, even though it wasn't the primary microphone for those other drums.
The same goes for the kick drum mic, an AKG D 112. The mixer that represents this mic will receive all the kick drum samples recorded with the D 112, but it will also receive all the other samples of all the other drums that were recorded with the D 112.
So the kick drum's NN-XT, for example, will route out to 12 mixers (14 mics). Each of those mixers, also receiving signal from other NN-XT's, will feed into another DAW, such as Logic, onto their own individual channel strips.
There are also 4 additional 6-channel mixers. They are being used to act as spot mics for 3 cymbals and sticks. None of these cymbals actually had separate spot mics. I'm just using the signal from the closest mic to act as a spot mic. I don't use spot mics on cymbals because the overheads pretty much are spot mics, they just happen to also make the rest of the kit sound brighter.
Take the crash cymbal, for example. The closest mic to it was the left overhead mic. So when the crash cymbal is routed to the Overhead Mics mixer, the signal from the left overhead is split into two signals, A and B. A goes to the Overhead Mics mixer's left channel input, like normal, while B goes to a separate mixer. This mixer is getting the same signal, but it gives me the ability to turn up the crash cymbal as it was recorded with the left overhead mic without turning up all the other drums as they were recorded with left overhead mic, and without turning up the crash cymbal as it was recorded from all the other mics.
That's something that I can't really do when I'm recording a live drummer, but since I have the option to do it now, I'm fucking doing it! I don't actually have to use separate mixers for those spot mics and the cymbals. The B signal could just be routed straight out to Logic, but I like the idea of them having a "home". I wanna be able to look at Reason and see those microphones being represented instead of lost in all the shit.
ANYWAY, here's a screenshot of the routing I did. That large mixer on top and the small mixer below it won't actually be used. I'm just using them right now while I build the kit so I won't have to have Logic open for the building process. I'll also save a copy of the session with those mixers included. That way I can use it while I'm running Reason in standalone mode (which I never do, though).
 |
| Click to enlarge |
My next post will be about how I fake a trash mic with the binaural panner (surprise surprise) in Logic. I hope this was somewhat interesting.
Making a Kit - Pt. 2: Getting Carpal Tunnel Syndrome
Ok, to summarize part 1, I'm making a sampled drum kit from some live drum samples I recorded a few weeks ago. Each drum was hit 3 times at different velocities (really soft 3 times, soft 3 times, harder 3 times, etc), so there are lots of files to deal with. And not only that, but I'm not just using the spot mic on each drum, I'm using ALL the mics for each drum. I want the bleed.
---------------------------------------------------------------------------------------------------
Alright, I finally finished all the editing. I had to open up the Pro Tools session and cut up all this shit. I split the regions at each drum hit. I did it all manually. Strip Silence wasn't accurate enough for this in some places, so I figured I'd just do it all manually. It sucked ass, but if I had used Strip Silence, I would have had to go back and check each hit, and probably do some minor tweaks to a lot of them anyways.


If you ever do this, just make sure the drum tracks are grouped. I probably would have just killed myself if grouping didn't exist. Shit would have taken days.
Then I had to do some edits to some of the hits. There were minor problems, and I wanted to keep the samples, so I just edited them instead of trashing them.

So once each the samples were edited and faded right, I needed to convert them to new files. To do this I just consolidated each region. The key command is Shift-Option-3, but you can get to it through the edit menu.

So when you consolidate, a new file is created. But that caused a problem, because I already had a lot of files in my Audio Files folder (remember this was at the end of a song, in the same session... I don't know why I didn't make a new one), so trying to sort through all that shit would have sucked really bad. To avoid this, I went to the Disk Allocation window and changed all the drum tracks to a new location. This didn't move where the preexisting files were located, but it did direct the new files to a new folder. So I did this before I consolidated the regions.

So after a few hours of editing, I finally had all my samples. Now I just had to organize them. I left them all in the same Audio Files folder so that they would automatically be renamed (Kick_09.01, Kick_09.02, Kick_09.03, and so on). Since I had a sample from every mic for every hit, I had files labeled as "Kick_09.27" and "Hi Tom_09.27" for a hi hat... so yeah, that could have gotten pretty confusing. As I consolidated regions, I kept track with all the file names in a text document.

I ended up with 819 samples. I can't imagine how shitty it's gonna be trying to load in and arrange all this shit in a sampler. It's not going to be fun, and it's probably going take take almost a whole day.
EDIT: I forgot to include this. I wanted to give an example of how a tom sounds with all the other mics open. So here's a video of a tom playing with all the mics, then just the single spot mic, and then all the mics again.
It sounds so much bigger with all the other mics. It's mainly the overheads and room mics that make it sound bigger, but the other mics help too.
A Couple of Plugins
For those of you that were wanting to do binaural mixing on a PC, here are a couple of other free plugins. I haven't even tried them out, as I'm super busy right now and not on my PC, but I don't know how good they are. They don't claim to do binaural processing since they never use the word "binaural" in the descriptions, but they do say they simulation 3D spacial positioning.
http://www.wavosaur.com/vst/spatial-imaging-plugins.php
It's the two on the bottom: Prodyspace an Dum Mic Positioner
That other plugin I mentioned in my Binaural With Fruity Loops post looks more trustworthy, but it'd sound too great.
I'll mess with them later and let you now how they are, but I'm not expecting much.
- p.s. - buy Logic
Friday, September 17, 2010
Making a Kit - Pt. 1: Bitching About It
Well, yesterday was my last day of class and today was my last seminar. I have finals Monday, Tuesday, and Wednesday. Damn it! I don't want school to be over!
Anyways, today is the day I begin my quest to build a fuckin sampled drum kit. It wouldn't be so bad or time consuming, but I'm going a little overboard. Instead of just doing it the standard way, I'm sampling each drum from every mic that was used.... I'll explain it more clearly in a second.
One problem I have with sampled drum kits is that there is a lack of control and a lack of realism. Even though they sampled drums sound awesome, each drum is only sampled with one mic. That's really awesome because you get really clean results. The only problem is that there is no bleed.
For example, when I record a live kick drum, the mic on the kick drum also picks up everything else the drummer is playing. I have to go back and add a noise gate to remove everything that's being played when the kick isn't being played... so yeah, I am getting rid of the bleed, but if a tom is hit at the same time or immediately after the kick, then that isn't removed with the noise gate.
I realize that bleed is considered to be an annoying thing (and it is. It's annoying as shit), but it can also be a good thing. It can really add space to the drum mix. Take the hi-hat for example. I don't gate the hi-hat. That means that throughout a song, you hear the kick drum being picked up from the kick mic and the hi hat mic (plus a bunch of other mics). The same goes for everything else. Even a specific drum is gated, there's still gonna be a little bleed every now and then (unless you're gating so much that the drums don't even get a chance to ring out), so I'd like to be realistic and add this into my sampled kit.
This way, I'll at least be able to have it if I want it. I'll also have the option to completely remove bleed from certain drums with the click of a button. For some, I'll even set a knob to control the amount of bleed. This way, I can have complete control.
I'm also doing letting the overhead mics pick up everything, not just the cymbals, and I'm also doing room mics.... that's a bitch in and of its self, so needless to say, all the bleed bullshit is going to take forever.
Right now I'm just cutting up the audio files and organizing them. That's gonna take a while. I really hate doing this shit. I love sampling stuff (but not sampling parts of songs or drum loops... I find that to be rather lame), but I really hate the whole editing process. I love the results though.
Oh well, I'm gonna go finish doing that. I'll make a post tomorrow about the editing process. It's a pretty dry topic and there's no fun to be had, but there will be good info about how to do this without pulling your hair out.
Wednesday, September 15, 2010
Fudgin Paperwork
Bleh, currently doing a crap ton of paperwork. My final projects (Sound-to-Picture, SSL, and Neve) are due this Saturday. I already turned in sound-to-picture, so all that's left is to do the fucking paperwork for the SSL and Neve projects. I'm finsihsing the SLL paperwork right now
 (my project partner has the other half)
So yeah, that pretty much blows. Anyways, I don't know if any of you guys use Logic or Reason, but I was planning on doing a tutorial on how to build a sampled drum kit (with overhead mics and room mics) in Logic's ESX24 or in Reason using the NNXT. Either is fine, although, surprisingly, Reason has one cool feature that Logic doesn't. I'm gonna be making it anyways, using some recordings I did of the school's drum kit, so I figure I can kill two birds with one stone and just do a post about it. If anybody has a preference, let me know. If not, I'll probably use Reason.

So yeah, that pretty much blows. Anyways, I don't know if any of you guys use Logic or Reason, but I was planning on doing a tutorial on how to build a sampled drum kit (with overhead mics and room mics) in Logic's ESX24 or in Reason using the NNXT. Either is fine, although, surprisingly, Reason has one cool feature that Logic doesn't. I'm gonna be making it anyways, using some recordings I did of the school's drum kit, so I figure I can kill two birds with one stone and just do a post about it. If anybody has a preference, let me know. If not, I'll probably use Reason.
Sunday, September 12, 2010
Binaural With Fruity Loops
EDIT: So yeah... I read some comments and it got me worried. I don't recommend you use Fruity Loops. If you already use it and can get good results, that's fine, I don't wanna discredit you because of the software you use. But it is extremely limited compared to other DAWs, so I'd suggest you look into Pro Tools, Logic, Ableton, or even Cubase. There's a world of difference.
A couple of you guys wanted a binaural tutorial for Fruity Loops, so here you go.
Ok, first off, I'm not a Fruity Loops user. I'm pretty much an everything-other-than-Fruity-Loops user. Mainly because I use a Mac for all audio-related tasks (although I use my PC for everything else). There are other reasons, but I don't wanna sit here and diss FL since it suits many people's needs just fine, and plenty of people turn out great sounding material with it, so I don't wanna discourage anyone from using it. If you can get a good sound with it and you like working with it, that's all that matters.
Bad news though. Fruity Loops can't do all that stuff I was doing in my last post. The (semi) good news is that you CAN do binaural mixes in FL. But... it kinda sucks. This isn't FL's fault though. It's the plug-in that's being used that eats ass.
It does add a binaural-ish effect, but don't expect anything amazing. It's free, so guess one can't really complain. There are some you can pay for, but I wouldn't say they're worth the money. I will say that if you don't mind doing some sketchy stuff to your PC, Logic's binaural panner does a great job (*cough cough*), although I can't say I'd recommend that (>_>)
1.So first off, download the Binaural Simulator here: http://gregjazz.com/index.php?page=resources
If you feel like paying, there's also this: http://www.kvraudio.com/get/2365.html but I can't guarantee that it's worth a shit. I see a bunch of LFO controls, and hardly and controls for position. This may be an autopanner. The description on the page says it can do autopanning, but it looks like that may be all it does.
EDIT: I found more free plugins. Not too great, but see my other post for a link - A Couple of Plugins
2. After you download the plug-in, you'll need to unzip it and copy the dll file (the only file in there)
3. Now go to C:\Program Files\Image-Line\FL Studio 9\Plugins\VST and paste the file in there
4. Now open Fruity Loops and open the Mixer window

5. Select what channel you want to work with. Now, click one of those arrows beside an empty insert slot, go to "Select" as if you were going to load a plug-in, but instead, choose "More"

6. Now scroll down to VST and check the Binaural Simulator

7. So now you can go back to "Select" and select the Binaural Simulator
As you can see, it it has a big square that represents a room, some knobs for reverb, and some grey spheres and some writing and shit.

I don't know why there are reverb settings in here. Don't use that crap. Just continue using whatever reverb you are already using. Combining the two will cause a weird clusterfuck and make it sound like you are in two spaces at one. Not to mention that they don't specify what type of space this reverb is simulating. I guess they threw the reverb in as a way to compensate for a lack of room-size control, but it was just a dumb idea.
Also, there's no doppler effect, and no way to control the spread of a stereo signal. But anywho, the big square shows where in the room the signal will be coming from, and the other little rectangle is for height.
 (complements of MS Paint)
Now, when you put something behind you, it sort of kind of maybe sounds like it's behind you, but mostly, it just gets softer and muffled. Same with the height control. But it kinda works, so it's worth playing around with. It does have the option to process the signal in a way that lets you hear the binaural effect through speakers. Again.... sort of works.
Here's a video with me panning some footsteps around with it.
Like I said, not such a great plug-in, but it's better than nothing I guess.
If you guys really want to do some binaural mixing but don't want to use Logic, then hit up Google and do a bunch of searching for "Binaural VST", "Binaural Plugin", "Binaural Panner -Logic" and whatever else you can think of. Just avoid anything that says "Binaural Autopanner". It's a crock of shit and it's not the same thing. In all my searching, I only found the two plug-ins listed above, and a few others, but the pages were in Portuguese or something, so.... yeah
Anyways, I hope it helped you out.
A couple of you guys wanted a binaural tutorial for Fruity Loops, so here you go.
Ok, first off, I'm not a Fruity Loops user. I'm pretty much an everything-other-than-Fruity-Loops user. Mainly because I use a Mac for all audio-related tasks (although I use my PC for everything else). There are other reasons, but I don't wanna sit here and diss FL since it suits many people's needs just fine, and plenty of people turn out great sounding material with it, so I don't wanna discourage anyone from using it. If you can get a good sound with it and you like working with it, that's all that matters.
Bad news though. Fruity Loops can't do all that stuff I was doing in my last post. The (semi) good news is that you CAN do binaural mixes in FL. But... it kinda sucks. This isn't FL's fault though. It's the plug-in that's being used that eats ass.
It does add a binaural-ish effect, but don't expect anything amazing. It's free, so guess one can't really complain. There are some you can pay for, but I wouldn't say they're worth the money. I will say that if you don't mind doing some sketchy stuff to your PC, Logic's binaural panner does a great job (*cough cough*), although I can't say I'd recommend that (>_>)
1.So first off, download the Binaural Simulator here: http://gregjazz.com/index.php?page=resources
If you feel like paying, there's also this: http://www.kvraudio.com/get/2365.html but I can't guarantee that it's worth a shit. I see a bunch of LFO controls, and hardly and controls for position. This may be an autopanner. The description on the page says it can do autopanning, but it looks like that may be all it does.
EDIT: I found more free plugins. Not too great, but see my other post for a link - A Couple of Plugins
2. After you download the plug-in, you'll need to unzip it and copy the dll file (the only file in there)
3. Now go to C:\Program Files\Image-Line\FL Studio 9\Plugins\VST and paste the file in there
4. Now open Fruity Loops and open the Mixer window

5. Select what channel you want to work with. Now, click one of those arrows beside an empty insert slot, go to "Select" as if you were going to load a plug-in, but instead, choose "More"

6. Now scroll down to VST and check the Binaural Simulator

7. So now you can go back to "Select" and select the Binaural Simulator
As you can see, it it has a big square that represents a room, some knobs for reverb, and some grey spheres and some writing and shit.

I don't know why there are reverb settings in here. Don't use that crap. Just continue using whatever reverb you are already using. Combining the two will cause a weird clusterfuck and make it sound like you are in two spaces at one. Not to mention that they don't specify what type of space this reverb is simulating. I guess they threw the reverb in as a way to compensate for a lack of room-size control, but it was just a dumb idea.
Also, there's no doppler effect, and no way to control the spread of a stereo signal. But anywho, the big square shows where in the room the signal will be coming from, and the other little rectangle is for height.

Now, when you put something behind you, it sort of kind of maybe sounds like it's behind you, but mostly, it just gets softer and muffled. Same with the height control. But it kinda works, so it's worth playing around with. It does have the option to process the signal in a way that lets you hear the binaural effect through speakers. Again.... sort of works.
Here's a video with me panning some footsteps around with it.
Like I said, not such a great plug-in, but it's better than nothing I guess.
If you guys really want to do some binaural mixing but don't want to use Logic, then hit up Google and do a bunch of searching for "Binaural VST", "Binaural Plugin", "Binaural Panner -Logic" and whatever else you can think of. Just avoid anything that says "Binaural Autopanner". It's a crock of shit and it's not the same thing. In all my searching, I only found the two plug-ins listed above, and a few others, but the pages were in Portuguese or something, so.... yeah
Anyways, I hope it helped you out.
Saturday, September 11, 2010
5.1 Converted to Binaural
NOTE: Before listening to any examples, know that earbuds are best for listening to binaural audio, as the sound goes directly to your eardrum. Binaural audio is processed in a way that effects it the same way your pinna would, and if you use headphones, the audio is technically going through two pinnae. I use headphones most of the time anyways. It doesn't fuck with it that bad, but there is a difference. Also, binaural audio doesn't work for everyone. Everyone's ears are different, and this works based on the "average" person's ear and head shape, so if you have a really fucked up skull or weird ears, then this might not work for you.
Ok. Here's a little something I've been working on. I was wanting to make a jimmy-rigged version of a BRS system. BRS is binaural room scanning, and it allows you to do 5.1 mixes in headphones since it converts 5.1 to binaural. It even lets you hear the mix in different types of room through different types of surround systems.
Well, doing that for real obviously requires some serious programming skills and electric/mechanical engineering (or some shit) skills that I don't have. You'd have to make some type of software, special headphones, and a bunch of other crap that I probably don't even care to know about.
So, I figured I'd go the super-easy route and just try to do it with Logic. Since I don't have headphones that do head tracking, I've been using a Wiimote for that. No, I don't tape it to my head, I just hold it in my hand and move it the same way my head moves.
Well, in order to do all this shit, the first thing that I had to do was convert a 5.1 mix to a binaural mix. Well that'd be pretty easy if you just had 6 mono tracks to work with, but I wanted it to work instantly without having to demix it first. I wanted to be able to pull in the track and just let it be ready to go. So I used a bunch of routing that would demix it in real-time.
Let it be known that this doesn't work so well. It kind of, sort of has a binaural effect, but there are problems. One problem is that field recordings are done using many different types of surround micing techniques. It makes the most sense to set up the binaural mix so that it would simulate a regular 5.1 setup (speaker placement), but in some cases, that completely screws up the Ls and Rs and makes everything that should be behind you sound like it's right be-fucking-side you.
To combat this, the Ls and Rs are moved further back, which takes them away from your ears, but it also stretches the whole mix further than it should be. It removes some of the "whoa! That shit is behind me" factor that should be there (for some mixes anyways. Like I said, it depends on how it was recorded)
Really, the main problem is that this is "blurrier" than a real 5.1 mix being played on a 5.1 system, and it's also "blurrier" than a regular binaural mix. It's hard to close your eyes and pin-point exactly where something is. I can't complain though, because I'm not doing this with software or hardware that was designed for this purpose. Also, this isn't the same as BRS. BRS was made so you could do a 5.1 mix without needing a 5.1 setup. What I'm doing is taking 5.1 mixes and converting them to 5.1. You could use do a few extra steps and be able to do a 5.1 mix using this method, but since it's so inaccurate, there's really no point in doing it (although I do give an example of how this is done)
So, at the end of the day, the only use I get out out this is being able to pull in a 5.1 Apple Loop and go "coooool.... it almost sorta sounds like a shitty version of real life". Either way, I figure it's a good starting point, and this is something I'm constantly messing with and changing, so it may end up working pretty well one day. Anyways, if here's how it's done.
First, I take the source audio and buss it out to 6 different aux channels

This is where it starts. I'm basically splitting up the source into 6 separate channels, which will each become the corresponding "speaker"
Here's the most important step. These are the aux channels that the source channel has been bussed to. They are all set to be 5.1 channels

On each of these channels, I inserted the Gain plug-in. (Notice the labeling of the channels... but ignore the fact that they are out of order)
Using the gain plug-in, the necessary channel (depending on what "speaker" is being worked with) is routed to away from all the other channels (this is for the Left speaker, so L has been routed to B, while everything else is routed to A, and LFE is by itself anyways

Now everything other than L is turned all the way down. LFE must be turned down too.

Now, each channel will only have the channel information it needs. This has been done for each channel (L, R, C, Ls, Rs, and LFE)
Now, each of these 5.1 aux channels are now bussed to mono aux's
 This step allows each 5.1 signal (which only contains one mono signal anyways) to be isolated in its own channel strip.
Now, each mono channel is bussed to a stereo channel

Again, excuse the fact they they are out of order. Anyways, each of these channels are set to have a binaural output, which brings in the binaural panner. They are each panned according to the placement of each speaker they represent. You can see on the Ls and Rs that they aren't where they should be. They should be at -114 degrees, but they are at -150 here. This was one of those cases where it sounded wrong when it was panned normally.
Now, these channels, having been panned (and diffuse-field being turned off) are bussed to a single aux
 This aux contains the Binaural Post-Processing plug-in. Now everything should be totally binaural.
The next step is redundant and I have no idea why I did it, but I bussed that aux to another aux...

So that is how you split a 5.1 track into mono signals and make it binaural.
Here is how you do 5.1 mixing using this method. It's pretty much the same process, but you have to have a 5.1 channel strip for each instrument you plan on using.

You can see that each channel (Test Audio and Test MIDI) have been bussed to a "splitter", which is pretty much the same as the Source channel (the very first picture) except this one has a send going to a reverb. All the routing after this step is the same as above.
This way, you can use the surround panner, and it acts like a binaural panner.
This is where you can really notice the problems. When something is behind you, it still sort of sounds like it's in front of you. Also, there's a huge dead space in the very very back where the sound almost disappears. This dead spot gets bigger when you pan the Ls and Rs to -114 (where they should be if you're trying to replicate a 5.1 setup). Plus, when swinging the sound from back to front, it's hard to tell when exactly it stops being behind your ears to being right beside your ears.
Here's a video with Ls and Rs being at -114 (worst dead spot, but most realistic). I used an Apple Loop of footsteps for this video. Also, note that these may even sound less believable due to the sound quality (not sure if Blogger reduces sound quality on uploaded videos the same way Youtube does)
Now, here's a video with Ls and Rs panned at -150 (smaller dead spot, less realistic)
Here's Ls and Rs being panned at -165 (smallest dead spot, least realistic)
This video is a straight up binaural version. There's no funky routing and no conversion. It's purely binaural. Notice how much better this one is. You can close you eyes and pinpoint where the footsteps are.
Ok, here's a sample of the first process I showed you. It's an Apple Loop of rain. First, you hear the whole mix and see all the routing. Then the Ls and Rs are solo'd (everything else is muted. Soloing isn't effective due to the routing), and I switch the panning from -150 to -165. You can hear that they sound more "behind" you like this (but this panning doesn't work with every 5.1 mix recording. It depends on the mic placement when recorded). Then everything is unmuted and you hear it all together with the -165 panning. Then the LFE (which contains all the subwoofer info) is muted
Sadly, I don't have a normal binaural version of this, as it's not just one signal being panned around. It's a full 5.1 mix being split and converted to binaural, so this is all I can give you. This would have been recorded with a binaural dummy head.
I would give you a video where I use the Wiimote for headtracking, but it's pretty unimpressive and confusing unless it's your own head moving. But know the when doing that, you can totally hear that dead space I've been talking about. You turn all the way around hear a big gap in front of you.
I hope this was semi-cool. Enjoy
Ok. Here's a little something I've been working on. I was wanting to make a jimmy-rigged version of a BRS system. BRS is binaural room scanning, and it allows you to do 5.1 mixes in headphones since it converts 5.1 to binaural. It even lets you hear the mix in different types of room through different types of surround systems.
Well, doing that for real obviously requires some serious programming skills and electric/mechanical engineering (or some shit) skills that I don't have. You'd have to make some type of software, special headphones, and a bunch of other crap that I probably don't even care to know about.
So, I figured I'd go the super-easy route and just try to do it with Logic. Since I don't have headphones that do head tracking, I've been using a Wiimote for that. No, I don't tape it to my head, I just hold it in my hand and move it the same way my head moves.
Well, in order to do all this shit, the first thing that I had to do was convert a 5.1 mix to a binaural mix. Well that'd be pretty easy if you just had 6 mono tracks to work with, but I wanted it to work instantly without having to demix it first. I wanted to be able to pull in the track and just let it be ready to go. So I used a bunch of routing that would demix it in real-time.
Let it be known that this doesn't work so well. It kind of, sort of has a binaural effect, but there are problems. One problem is that field recordings are done using many different types of surround micing techniques. It makes the most sense to set up the binaural mix so that it would simulate a regular 5.1 setup (speaker placement), but in some cases, that completely screws up the Ls and Rs and makes everything that should be behind you sound like it's right be-fucking-side you.
To combat this, the Ls and Rs are moved further back, which takes them away from your ears, but it also stretches the whole mix further than it should be. It removes some of the "whoa! That shit is behind me" factor that should be there (for some mixes anyways. Like I said, it depends on how it was recorded)
Really, the main problem is that this is "blurrier" than a real 5.1 mix being played on a 5.1 system, and it's also "blurrier" than a regular binaural mix. It's hard to close your eyes and pin-point exactly where something is. I can't complain though, because I'm not doing this with software or hardware that was designed for this purpose. Also, this isn't the same as BRS. BRS was made so you could do a 5.1 mix without needing a 5.1 setup. What I'm doing is taking 5.1 mixes and converting them to 5.1. You could use do a few extra steps and be able to do a 5.1 mix using this method, but since it's so inaccurate, there's really no point in doing it (although I do give an example of how this is done)
So, at the end of the day, the only use I get out out this is being able to pull in a 5.1 Apple Loop and go "coooool.... it almost sorta sounds like a shitty version of real life". Either way, I figure it's a good starting point, and this is something I'm constantly messing with and changing, so it may end up working pretty well one day. Anyways, if here's how it's done.
First, I take the source audio and buss it out to 6 different aux channels
This is where it starts. I'm basically splitting up the source into 6 separate channels, which will each become the corresponding "speaker"
Here's the most important step. These are the aux channels that the source channel has been bussed to. They are all set to be 5.1 channels

On each of these channels, I inserted the Gain plug-in. (Notice the labeling of the channels... but ignore the fact that they are out of order)
Using the gain plug-in, the necessary channel (depending on what "speaker" is being worked with) is routed to away from all the other channels (this is for the Left speaker, so L has been routed to B, while everything else is routed to A, and LFE is by itself anyways

Now everything other than L is turned all the way down. LFE must be turned down too.
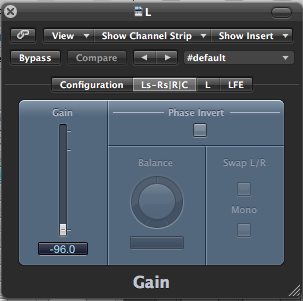
Now, each channel will only have the channel information it needs. This has been done for each channel (L, R, C, Ls, Rs, and LFE)
Now, each of these 5.1 aux channels are now bussed to mono aux's

Now, each mono channel is bussed to a stereo channel

Again, excuse the fact they they are out of order. Anyways, each of these channels are set to have a binaural output, which brings in the binaural panner. They are each panned according to the placement of each speaker they represent. You can see on the Ls and Rs that they aren't where they should be. They should be at -114 degrees, but they are at -150 here. This was one of those cases where it sounded wrong when it was panned normally.
Now, these channels, having been panned (and diffuse-field being turned off) are bussed to a single aux

The next step is redundant and I have no idea why I did it, but I bussed that aux to another aux...

So that is how you split a 5.1 track into mono signals and make it binaural.
Here is how you do 5.1 mixing using this method. It's pretty much the same process, but you have to have a 5.1 channel strip for each instrument you plan on using.

You can see that each channel (Test Audio and Test MIDI) have been bussed to a "splitter", which is pretty much the same as the Source channel (the very first picture) except this one has a send going to a reverb. All the routing after this step is the same as above.
This way, you can use the surround panner, and it acts like a binaural panner.
This is where you can really notice the problems. When something is behind you, it still sort of sounds like it's in front of you. Also, there's a huge dead space in the very very back where the sound almost disappears. This dead spot gets bigger when you pan the Ls and Rs to -114 (where they should be if you're trying to replicate a 5.1 setup). Plus, when swinging the sound from back to front, it's hard to tell when exactly it stops being behind your ears to being right beside your ears.
Here's a video with Ls and Rs being at -114 (worst dead spot, but most realistic). I used an Apple Loop of footsteps for this video. Also, note that these may even sound less believable due to the sound quality (not sure if Blogger reduces sound quality on uploaded videos the same way Youtube does)
Now, here's a video with Ls and Rs panned at -150 (smaller dead spot, less realistic)
Here's Ls and Rs being panned at -165 (smallest dead spot, least realistic)
This video is a straight up binaural version. There's no funky routing and no conversion. It's purely binaural. Notice how much better this one is. You can close you eyes and pinpoint where the footsteps are.
Ok, here's a sample of the first process I showed you. It's an Apple Loop of rain. First, you hear the whole mix and see all the routing. Then the Ls and Rs are solo'd (everything else is muted. Soloing isn't effective due to the routing), and I switch the panning from -150 to -165. You can hear that they sound more "behind" you like this (but this panning doesn't work with every 5.1 mix recording. It depends on the mic placement when recorded). Then everything is unmuted and you hear it all together with the -165 panning. Then the LFE (which contains all the subwoofer info) is muted
Sadly, I don't have a normal binaural version of this, as it's not just one signal being panned around. It's a full 5.1 mix being split and converted to binaural, so this is all I can give you. This would have been recorded with a binaural dummy head.
I would give you a video where I use the Wiimote for headtracking, but it's pretty unimpressive and confusing unless it's your own head moving. But know the when doing that, you can totally hear that dead space I've been talking about. You turn all the way around hear a big gap in front of you.
I hope this was semi-cool. Enjoy
Thursday, September 9, 2010
Stalling
Hey. I'm planning on doing my next post about something super cool involving binaural mixing. I, once again, don't have time to make a real post. I have final exams week after next, and I have 2 projects that are due before then, so I'm extremely busy. Also, I'm having to master some tracks for a guy (I also did the mixes, but that was several weeks ago) and meet up with him tomorrow morning to get paid!
Also, I'm trying to set up my own little business. I already kinda have one going, but it hasn't been too much since I've been busy with school. I'll be doing mixing and mastering, but now I need a business name since I'm gonna be accepting credit cards n shit. I'll be setting up a website too, so I need the name for that also. But as it turns out, some asshat already named his band Mantooth Music and already has MantoothMusic.com. So I guess I'll be changing the name of my blog too.... dammit. Anyways, I'll have that binaural mixing article up soon.
By the way, sorry I haven't got a chance to read anyone else's new posts! I just now got a few minutes free to do this. But now, back to mastering!
Wednesday, September 8, 2010
Videos
I just got a chance to read my comments and noticed a couple of you said I should give some audio examples. I guess I'll go one step further and try to incorporate a video with my next post. As for my last post... I don't have anything to use for that right now. I guess I can upload some audio examples and include them within an edit of the last post, or I could just do a 2nd post about binaural.
Superhero Bobblehead, I wasn't sure if you wanted an example of all the reverb crap I was talking about, or just binaural in general. If you go to youtube and look up "binaural", you'll get plenty of results. If you wanted an example of what I was talking about, that'll have to wait until tomorrow or even the next day when I make my next post
Thanks to everyone for the feedback!
Tuesday, September 7, 2010
Binaural Mixing
I'm sick of doing those basic topics, so I'm taking a break from that. I want to write about binaural mixing. First of all, I wanna say that I have learned jack shit about binaural mixing at school. They've talked about binaural recording (which is nothing more than sticking a fucking dummy head with built-in mics into a room), and they've mentioned BRS (binaural room scanning) and the fact that nobody uses it.
So we've learned a lot about binaural in general, but not making binaural mixes from regular sessions. They haven't even mentioned the binaural panner in Logic, which I find odd, because IT'S FUCKING SWEET! It can really take a mix and just open it up, or sometimes, make it total mush.
I use it in different ways. If I'm doing something that's already kinda spacey, has a lot of cool noises, or is unbelievably simple (having only several tracks), then I'll do all of most of the mix with binaural panners. If something is really complex (having a fuck load of tracks), is really heavy, or is too traditional, then I'll only use the binaural panner on a few, if any, channels.
Everything, of course, is up to personal taste, so there's no need to go into when to use it and for what instruments and where to put them and all that good shat. I will say though, that I usually always leave heavy guitars (or anything that needs to be extremely "solid") just as they are. I don't even bother popping them into binaural mode, because it kind of takes them and softens them up. Notice I said usually, so if I'm feeling squirrelly or if the tone doesn't need to be uber rock solid, I'll fuck with them.
So here's what I really want to talk about: Time-based effects + binaural panners
First of all, if you are wanting your reverbs and delays to follow their sources (e.g. a left-panned guitar to have its reverb also come from the left), then you need to make sure your aux send is post pan. If you don't want this, just leave it post fader.
My real issue is whether or not to make my aux's binaural... I almost always do, though. And when I do, I give the L and R a 180 degree spread. It just sounds so much better. If I'm using space designer in a normal mix and I load an impulse response called "bigass mountains," then I'll be like, "oh man, it feels like I'm standing in the middle of some bigass mountains." But when I load that same impulse response in a binaural mix, it just doesn't cut it. It take my 3 dimensional, super realistic, super deep mix and applies a nice matte finish to it. It takes the whole thing and puts a yellow cigarette-smoke-stained window in front of it... sort of. Basically, it takes a little life out of it, and I don't really feel like I'm in the mountains.
But if I put a binaural panner on my fx return and spread it out, it's like "FUCK ME SIDEWAYS I'M IN THE GODDAMN MOUNTAINS!" At least to me, anyways.
So having said all that, even though I'm stubborn and won't give up my ways, here are something that I still wonder about, and things you should consider when deciding which way you want to do it:
-If the plug-in is getting a full stereo input from the source, then it's taking a straight up copy of that binaural signal, which is already fucking binaural, and applying the effect to it. So this seems like the correct and most accurate way to do it would be to leave that aux channel with a normal panner, because if you use a binaural panner, then you are technically (and literally) rebinauralizating it (... >_> look it up, it's totally a real word).
-If all the other channels are binaural, and are made so to create a false space, then is the time-based effect already a good enough false space as is, or should it be doubly false? Wouldn't it make sense that if a normal reverb is the standard for a normal mix, that it should have extra dimension added to it to fit in properly with a binaural mix?
-If half the tracks are normal and half the tracks are binaural, then should there be separate time-based effects for each kind?
-Should the size of each binaural panner's space be the same (I'd say yes).
-If the size of a panner's space is enlarged, should reverb time or pre-delay be changed accordingly (I'd say no)
So that's some shit you should consider. It's all really depends on how you want to do it, so ignore my little answers up there... I just felt the need to throw in my opinion.
For anyone who hasn't messed with binaural panners yet, and hasn't read the info in the manual about it, here's something you should know: if you use more than one binaural panner, you should disable that "diffuse-field" shit on every single one of them, then buss all their outputs to a single aux, then apply the "Binaural Post-Processing" plugin to that aux. This does all the processing for the mix as a whole (or just for that submix as a whole) instead of having each individual panner do it for each individual track, which obviously uses more CPU. Plus, according to the manual, it sounds better that way too. I've repeatedly compared the two, and I can't hear a difference, so I guess it's one of those things where the quality is better, but nobody could ever tell you which is which. I just do it that way because of the CPU issue, plus you can choose what type of processing you want (which gives you the awesome "speakers" option)
Fuck, my posts are long as hell. If anyone actually reads my entire posts, then thank you!!! But if not, I don't blame you.
One final word of advice: if you don't have any mixes to work with or if your mixes don't really seem like they'd be suitable for binaural, then check out NIN.com and go to the remix section. You can download entire sessions, then load them into Logic and fuck with them. Even if you don't like their music, it's still really great stuff to use for experimenting with binaural.
Monday, September 6, 2010
Compression
Been busy the past few days. Went down to the school to track drums yesterday, and I've been at home working on that country song all day today. I'm having to do a crap ton of work on it. I wish they'd had more time to record, but whatever.
So now for some more basic stuff.
Compression
This is all personal taste, so I won't say too much. Plus, it all depends on what you're working with. Just make sure it isn't obvious that you are using compression. If you hear it, then tweak it until you don't hear it.
A good starting point is with your threshold all the way down, ratio all the way up, attack at 0, and release almost at 0. Then bring your threshold up until the softest parts (a soft note, the end of a sustained note, etc) aren't being effected (no gain reduction). Then bring your ratio back to whatever you like (you may have to readjust your threshold a little) and set your attack, release, and makeup gain accordingly. Makeup gain, obviously, should be set to "counteract" the gain reduction (+6dB if you have an average of 6dB reduction). What this does is put the loudest shit back where it was, and cause the lower parts to be boosted up. Now you have a (semi) even signal! :D
FYI, I set my attack and release before my threshold because it's easier to hear what's going on, but do whatever is easiest for you.
Also, for drums, make sure you set the attack long enough to let the attack of the drum through. If you set it too fast, you're killing the initial drum hit and mushing it in with the ringing of the drum.
Parallel Compression
When I mix, I use parallel compression a lot. I use it on kicks, snares, vocals, basses, and guitars (but usually only if they're really ballsy or if it's a solo). On kicks and snares, I've even went crazy and used parallel compression, then bounced it to a new track, then used more parallel compression.... and sometimes, I've even done it three times (and then compressed the final bounced signal)! Some might say that you shouldn't have to do it that much, but I wasn't exactly looking for a natural kick sound, and it sounded good, so whatever (I was working on some fucked up electronic music).
What is it? For those who've never head of it, it's basically having the same signal on two channels, and applying compression to just one of them, or using light compression on the first and heavy compression on the second. Then you mix in the more heavily compressed one pretty low (or however loud you want it), and it leaves you with a nice, thick signal. It gives you the dynamic range of an uncompressed signal, but you're assured that the level never drops too low. This is especially helpful on vocals, because you get a lively vocal with a solid foundation on the bottom. I love using it on kicks. On kicks, it'll just.... make you happy.
Master Buss Compression
A fucking lovely feature of the school's SSL is the master buss compressor. It takes your whole mix and compresses it. The concept is the same on any other board or in any DAW. Just add a compressor to your master fader. It'll even out your whole mix. But don't go crazy with it, just use it very lightly. I make sure I never go over 2dB of compression. There's no point in going further, because that's what mastering is for. Plus, you don't wanna do too much and end up with that weird sucking/pulsing shit.
When doing this, aim for a fast attack, a medium release (although it really depends on the song. I usually stick with a fast release regardless), and a 2:1 ratio. Set your makeup gain according to your gain reduction!
The main thing you have to remember is to APPLY THIS BEFORE YOU START MIXING! If you don't, you'll be mixing for hours, then apply the master compression, and well oh fuck, you're entire mix has changed... So yeah, apply it first, then keep adjusting it to make sure it's not going over 2dB (or whatever you want). And if you're going for a punchy kick, make sure it sticks through WITH the master buss compression applied, and make sure it sticks through just a little more than you'd actually want it to. The mastering process will suck a little bit of the punch out of it, so you should add a little to compensate.
So if you couldn't tell, I love compressing the fuck out of kick drums.
Just do what makes your ears happy.
OOOO OOOO OOOO!!!! I forgot! Some really cool you can do while tracking drums is setting up a trash mic. You just put a mic behind the drummer, a couple of feet above his head, and aim it down at the kit. You can use any kind of mic, but I usually use an SM58. I've also tried using my Nady SP1 a few times. It's this really crappy mic I got a couple of years ago. I really needed a new mic stand, and I saw a $25 package that included a mic, an XLR, and the stand, so I snagged it. It sounds bad, but that's why I like it.
But yeah, set up that mic, then apply 100:1 compression to it. Trash it up however you want. I always just do a fast attack, long release, and throw the threshold all the way down. Then you add this very low under the whole drum mix and it just sounds awesome.
It's pretty common. The idea comes from the SSL listen mic being used as a room mic. You just set up a mic and patch it into the listen mic input, and it gives you a super compressed signal so you'll hear the artist no matter where they are in the room, or how loud or soft they're talking. Well, it sounded pretty sick on drums, so people started using it as a drum mic.
SSL even has a plug-in for it: LMC-1 Plug-In
Ok, now I really need sleep. Buh bye
Subscribe to:
Posts (Atom)